The year my school friends and I turned 16 provided many opportunities for dressing up. At the time I was making a hobby of sewing decorative throw cushions (we still have more than anyone knows what to do with). I had been exploring the costuming part of the internet and thought I would like to do that too and I made a couple of very simple costumes with help from my mum.
My best friend had a Disney themed birthday party. I chose to go as Tia Dalma from
Pirates of the Caribbean. This choice brought lots of new experiences: making a corset, making patterns from scratch, researching and attempting screen accuracy, and accumulating supplies. It also later introduced the concepts of redoing things after wearing, and wearing an outfit only once.
While not necessarily obvious at a first glance Tia Dalma’s costume is based on 18th century styles, being comprised of a mantua over stays and skirts.
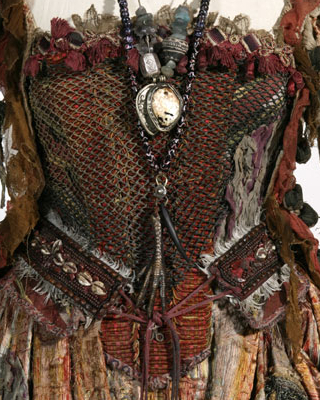
Stays
I used McCall's 4861 for the corset, changing the shape slightly to be more accurate to the movie. I made my corset with 5 layers. There are two inner layers, which are used for the boning channels, a lining, the fashion fabric and a net overlay. The linings and the outer layer were sewn together around three edges and slipped over the inner layers, a bit like putting a pillowcase on a pillow. The lower edge is bound with trim over the netting layer which started life as a reusable shopping bag. I didn’t shape the netting at all, just stretched it over the top of the corset. Having made other corsets now, I do not think much of this method of construction – all the separate layers never quite match up.
I chose not to include the damage that can be discerned on Tia Dalma’s corset in the movie – I couldn’t work out how to do it and it isn’t very noticeable.
To my great frustration I was never able to find an image of the back of the actual corset. I searched the internet and freeze-framed the movie but was unable to find a clear reference. Mine laces up the back, with a sort of loop tape because I was too lazy to do eyelets. When I first wore it I had to lace it up myself, which is possible but not fun.
Mantua
I worked with my mum to draw the pattern for the mantua (making sure it had all the right pieces and seam placement) over a shirt pattern. I found a lovely pink brocade at Spotlight for the mantua but there wasn’t a lot of it. I cut and sewed up the bodice and draped the remainder of the fabric as the skirt. And by draped, I mean I put it on and pinned the skirt to the bodice behind me, then took it off and handsewed where the pins were. The tail of the bodice is lined, up to the point where the skirt is joined in.
At first I made the bodice with shoulder seams and inset sleeves, expecting just to push them off-shoulder but this didn’t sit properly so we just cut the neckline round at off-the-shoulder level. The result is that I can’t raise my arms in this costume, but I have come to regard arm-movement as an unnecessary luxury in a costume, so I was (and am) not much bothered by this.
The sleeve frills are made with a circle of crinkled red and yellow tie-dyed fabric which I tea-stained to age; a circle of lace and a few extra strips of lace. I have never managed to find trim for the sleeve at all like that used in the film. I have replaced it since the party but I am still not happy with it.
The mantua attaches to the bodice with hooks and eyes. I had to add extra eyes to the bodice when I put it on since I kept losing them in the futz at the top of the stays.
To be continued...
Pirates of the Caribbean belongs to Disney