Sunday 28 May 2017

Piping and ruffles

After the sleeves, putting together the rest of an 1830s gown seemed simple. The bodice came together pretty much over a weekend. Every piece is flat lined. All the seams are piped on the outside and finished with Hong Kong binding on the inside. I tried to follow the correct historical construction as much as I could. I found Koshka-the-Cat's series on an extant bodice helpful when choosing techniques.
I piped each bodice front and then put another row of piping around the neck after the fronts were together. Getting the angle of the front-to-neckline corner on both fronts even was painful and required repeated unpicking.
I got most of the machine sewing done on the bodice on the Saturday and that left Sunday for handsewing – I sewed early in the morning, during the sermon at church, through my Dungeons and Dragons game in the afternoon, and into the evening when I got home. It felt like it was done very quickly but there was actually a significant lot of sewing time there. I whipstitched down the piping edge (neck) and the binding (waist). At least, I think it's whipstitch – it doesn't look exactly like other examples. For the boning channels I turned over the centre front seam allowances and the bust darts (as shown on this site). I used cable ties for boning and handstitched the channel seams over the cable ties so as to make sure the channels were wide enough.

The bodice does up with hooks and eyes. The top and bottom hook are closer the edge than the rest as was often done at the time. Having the hooks and eyes arranged this way made the closure feel a lot more secure than I usually find with hooks and eyes.
I decided I didn't like the diagonal decorations on the original bodice. So instead I used a ruffle based on a dress in the Victoria & Albert museum.
Original decoration.
Inspiration decoration.
My decoration.

I gathered the ruffle over a tape then handsewed it to the bodice.
I think it turned out rather nice.

Sunday 14 May 2017

Knit up the ravell'd sleeve of care

Most of the work on my 1830s dress was in constructing the sleeves.
For each sleeve, I cut out a lining of silk organza to support the puffed sections. The pleated sections of the sleeve I left unlined. The organza was not very steady to cut and all my pieces ended up being wider than the sleeve pieces they were to go with. I am grateful for this, as having the extra silk gathered inside the sleeve increased the support it gave.
I had bought 10 metres of Hong Kong binding for the dress, thinking it was a rather generous measurement, but it didn't even cover the sleeves (all that remains is in the picture above) so I went back and bought the same again. I was rather pleased with how the bound edges turned out. I had been increasingly dissatisfied with the quality of my garment internals; the Canberra show judges had recommended I improve there and this was a method used historically that was effective and looks good. However, I must confess to using the (historically accurate) cheat method of sewing through both layers of the binding at once.
 
The top edge of the silk was gathered to the pleated sleeve. The lower edge was sewn to the sleeve (only slightly gathered) and then it and the sleeve were gathered together and secured to cotton tape.
The top of the sleeve is shaped by inverted pleats.
Last steps for upper sleeves: seam and hem binding.
On to the lower sleeve. Again there are pleats around one end and gathering to fit the upper sleeve (and adding a cuff).
I made the cuff to fit my (narrow) wrist, not the pattern, so unfortunately the pleats had to be gathered a little to fit. The cuffs close with two hooks and eyes on the cuff and another in the split above the cuff.
The join between upper and lower sleeve sections only just made it around the arm of my sewing machine. What is it with modern machine and really wide arms? It makes it so much harder to sew sleeves – and sleeves aren't exactly an unusual thing for people to be making on sewing machines.
The struggle is real.
The final result:
Lastly I made six piped bands to be placed at different intervals on the sleeve. The pattern had the bands cut on the fold and only piped one side but the original dress clearly has piping on both sides. Why would you not pipe something when you could pipe it? (That said, I have seen extant dresses done the pattern's way as well.)
One edge of each ring is handsewn closed.
Once constructed, the rings are handsewn over the stitching lines around the sleeve. Thank goodness for that!  I had decided to have No Visible Machine Stitching on this dress and I don't even want to think about doing the entirety of the sleeve by hand.
There is a cotton tape running along the inside of each sleeve to hold the gather points at the right level. I ended up putting the tape on the outer side of my arm (opposite of the diagram above) as I found that the structure was more needed there. When I first tacked it on the inside of my arm the fabric was inclined to bunch up uncomfortably.

If I were to make 1830s again (and I plan to) I will do different sleeves (which will require patterning my own). This is not because I don't absolutely love these sleeves but because the 1830s had so many fabulous sleeves that one can't afford to do any style more than once.

Saturday 6 May 2017

Entering the era of extravagant sleeves

So, Jafa was coming round again and I needed a new dress to wear. And, as usual, it turned out the dress I wanted would require new stays. Not having the time (or, frankly, the inclination) to rush both stays and dress before April I started looking for something I could make to go with the late 1820s/early 1830s stays I have.

Way back in highschool my homegroup teacher gave me this pattern when she was clearing out her stash.
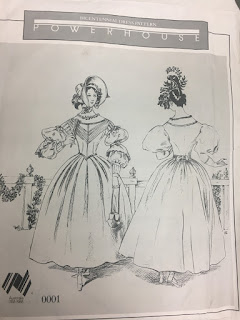
Powerhouse Bicentennial dress pattern 0001
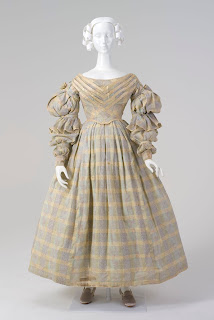
The pattern had been produced by the Powerhouse Museum as part of Australia's Bicentennial celebrations (before I was born). The pattern is taken from this dress in the museum's collection.
https://collection.maas.museum/object/54091#&gid=1&pid=4
I had long wanted to make this dress but had been putting it off until I was a good enough sewer to do it well (and until I had made a corded petticoat to go with it). So I got the pattern out, found that the fabric I had been considering was discontinued years ago, and decided to look for something else.

Then, wandering through Lincraft looking for artificial flowers I found the perfect fabric. It was so close in style to 30s' prints that, at $7.50 a metre, I bought the bolt. I think it's cotton; a burn test assured me that it was a natural fibre but my nose is not specialised enough to determine further – the store had it classified as 'assorted fabric'.
Samples of actual 30s’ prints can be seen here
Next, I traced off the pattern. The pattern is not quite like a normal pattern. There are non-standard markings for things like notches and folds and some of the other markings I was looking for weren't there at all. The lines are very thick so it must be almost a change in size depending on whether you trace off from the inside or the outside of the line. The instructions also are not step by step and don't have a lot of detail about the actual sewing. I wouldn't recommend this pattern for a beginner but If you’re happy to do research alongside, the pattern is still quite usable. (Although I do suspect the pattern makers of making some changes from the original dress to make things easier – like laying some pieces on the fold instead of piping all the edges, and possibly reducing amounts to be pleated.)

My measurements were pretty close to the pattern so I made no adjustments before putting together the first mockup.
This fitting was very different from fittings I've done in the past. Because of the lessons I have been doing I now know what signs of ill fitting to look for and what to do about fixing them. I recognised that the tightness in my shoulders required a square shoulder adjustment. Comparing the wrinkles on the mockup to the drawings in Figure Analysis*, I worked out that the pattern also required a small bust adjustment. It was a wonderful feeling to look in the mirror and see a bodice that didn't fit but also to know what I could do about it. I am looking forward to a future where clothes no longer hurt my shoulders. Small bust adjustments have not yet been covered by my sewing classes but I was able to use the techniques already taught to understand the instructions from Pattern Alterations*. The only uncertainty was what to do with the dart but after some consultation with a friend we worked out what to do (move it up so the whole length of the dart was kept.
2nd last fit - adjustment to darts needed
Original pattern
Adjusted Pattern

*both by Pat Fernon. These are the textbooks for the fashion design course at our local TAFE (vocational) college. They are published by TAFE and are not the easiest things to come by.